Node.js with SQL Server on Docker
This lab walks through the evolution of a simple Node.js bulletin board application, running on Docker. You’ll start with a simple app that uses hard-coded data, then add SQL Server for persistent storage, and a proxy to improve web performance.
You’ll learn about packaging applications in Docker images, running distributed applications across multiple containers, and adding instrumentation to your containers so you can see the health of your application. You’ll use the Docker command line, Docker Compose and Docker swarm for running the app.
Difficulty: Beginner (assumes no familiarity with Docker)
Time: Approximately 60 minutes
Tasks:
Task 0: Prerequisites
You will need:
- a copy of the application source code
- a Docker ID
Clone the source code from GitHub
Use the following command to clone the application source code from GitHub (you can click the command or manually type it). This will make a copy of the lab’s repo in a new sub-directory called node-bulletin-board.
git clone https://github.com/dockersamples/node-bulletin-board.git
And browse to the source code folder:
cd node-bulletin-board
Save your Docker ID
You need a Docker ID to push your images to Docker Hub. If you don’t have one, create a free Docker ID at Docker Hub.
Now save your Docker ID in an environment variable - you need to type this command manually with your own Docker ID:
export dockerId='your-docker-id'
Be sure to use your own Docker ID. Mine is
sixeyed, so the command I run isexport dockerId='sixeyed'.
Check your Docker ID gets displayed when you read the variable:
echo $dockerId
Task 1: Run v1 of the app in a container
The first version of the application uses a single container, running the Node.js application, and the data is only stored on the client’s browser.
Switch to the v1 source code branch:
git checkout v1
Now build the Docker image, which uses this Dockerfile to package the source code on top of the official Node.js image:
docker image build --tag $dockerId/bb-app:v1 --file bulletin-board-app/Dockerfile ./bulletin-board-app
When that completes you will have version 1 of the app in an image stored locally. Run a container from that image to start the app:
docker container run --detach --publish 8080:8080 $dockerId/bb-app:v1
Docker will start a container from the application image, which runs npm start to start the app. You can browse to the application on port 8080:
You’ll see the bulletin board application, and you can add and remove events:
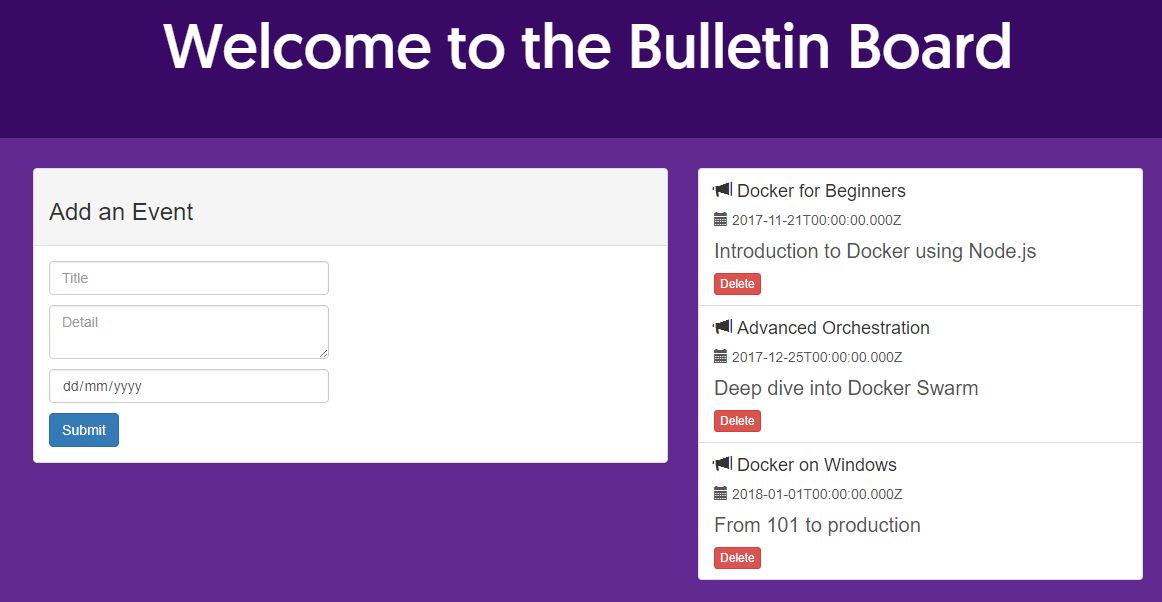
If you make some changes and refresh the browser, you’ll see your changes get lost. That’s because the events are only stored in memory on the client.
In the next step you’ll fix that.
Task 2: Add a SQL Server database container for storage
Storing data in client memory is only good for proof-of-concept applications. In this step you’ll build and deploy version 2 of the app, which uses a SQL Server database to store the events.
First switch to the v2 code branch:
git checkout v2
Now clear up all the containers from the previous part:
docker container rm --force $(docker container ls --quiet)
You’ll use Docker Compose to build and run the application. The compose file specifies the database and application containers to run, and how to configure them.
The compose file also contains the path to the application Dockerfile and to the database Dockerfile, so you can build the database and application images with one command:
docker-compose build
When that completes, you’ll have two Docker images:
-
<your-docker-id>/bulletin-board-db:v2- which is based on Microsoft’s SQL Server image and packages the database schema for the bulletin board -
<your-docker-id>/bulletin-board-app:v2- which is the new version of the Node.js application, using SQL Server to store events
You can start the whole app with Docker Compose:
docker-compose up -d
You’ll see compose starts the database first, because it’s specified as a dependency for the application container. Then it starts the app container.
If you list all containers, you’ll see there are two instances of the app container. One container started before the database was ready, so it failed - and then Docker Compose started a replacement container, which did connect to the database.
docker container ls --all
You’ll see it’s the same user interface, but now you can add and delete events and when you refresh the page they’re still there. The data is persisted in SQL Server.
The SQL Server database is not publicly available. In the docker-compose.yml file, the web container, the port 8080 is published so you can send traffic in, but no ports are published for the database. It’s only available to other containers and to Docker.
Task 3: Switch to high availability in swarm mode
Swarm mode lets you join several Docker servers together and treat them as a single unit. You deploy your app as services to the swarm, and Docker runs containers across all the servers.
You can run multiple instances of a container to deal with scale, and if a server goes down and you lose containers, Docker starts replacement containers on other servers.
First clear down all the containers from part 2:
docker container rm --force $(docker container ls --quiet)
Now switch to swarm mode:
docker swarm init --advertise-addr $(hostname -i)
This creates a single-node swarm. The output of the command shows you how to join other Docker servers to the swarm - all you need are more servers running Docker in the same network. You can scale Docker swarm up to hundreds of nodes.
The normal docker commands still work in swarm mode. Switch to the v3 source code branch:
git checkout v3
And build the application with Docker Compose:
docker-compose build
Version 3 has the same source code, but the Dockerfile for v3 of the the web app includes a HEALTHCHECK instruction. That tells Docker how to test if the application is healthy, and unhealthy containers are stopped and replaced with new ones.
You use the same Docker Compose file format to deploy in swarm mode, and there are some additional options available. Deploy version 3 of the app using the docker-stack.yml file:
docker stack deploy -c docker-stack.yml bb
A stack is a way to group many services together, so you can manage them as one unit. You can see the services in the stack, which tells you if the application is up:
docker stack services bb
You’ll see the application behaviour is exactly the same - containers are running from the same Docker images, but now they’re being scheduled by Docker swarm.
Docker swarm also supports rolling updates for applications running as stacks. In the next part you’ll add more functionality to the app, by running a web proxy.
Task 4: Add a reverse proxy to improve performance
Node.js is a good server platform, but it’s easy to improve performance by putting a reverse proxy in front of the Node.js application. The proxy is the public entrypoint to the app, and it handles requests from users.
Nginx is a popular open source web server which you can easily configure as a reverse proxy. The Nginx configuration in this part makes use of browser and server caching, which reduces the load on the web application and improves performance.
Switch to the v4 code branch:
git checkout v4
And use Docker Compose to build the application:
docker-compose build
Now you have v4 Docker images for all the application parts, you can upgrade the running stack using the new docker-stack.yml file:
docker stack deploy -c docker-stack.yml bb
Version 4 adds a proxy server to the stack which publishes port 80, so now you can browse to the app on the standard HTTP port:
The web application looks the same, but behind the scenes all the hard work is being done by the Nginx proxy. You can open developer tools on your browser and inspect the network responses - Nginx has added browser caching hints, and it’s also using a local cache to reduce traffic to the Node.js app.
There are also several instances of the proxy container running - Docker swarm load-balances incoming requests between those containers. If you had multiple servers in the swarm, you would be able to scale up to handle your incoming workload.
In the final part you’ll add monitoring to the application, so you can see what the Node.js container is doing.
Task 5: Add monitoring and an application dashboard
Docker swarm makes it super easy to scale containers, but before you go to production witrh a Dockerized application, you’ll want monitoring in place so you can see what all those containers are doing.
Two open-source technologies are very popular in the Docker ecosystem for monitoring containers. Prometheus is an instrumentation server that collects and stores metrics from your containers, and Grafana is an analytics UI that plugs into Prometheus to show dashboards.
In this part you’ll add Prometheus and Grafana to your application.
First switch to the v5 code branch:
git checkout v5
Now build the application, which will build images from the Prometheus Dockerfile and the Grafana Dockerfile:
docker-compose build
You have v5 images for all the application components now. Upgrade the stack to the v5 docker-stack.yml file:
docker stack deploy -c docker-stack.yml bb
The UX is the same, but now the Prometheus container is scraping metrics from the Node.js container, every 5 seconds.
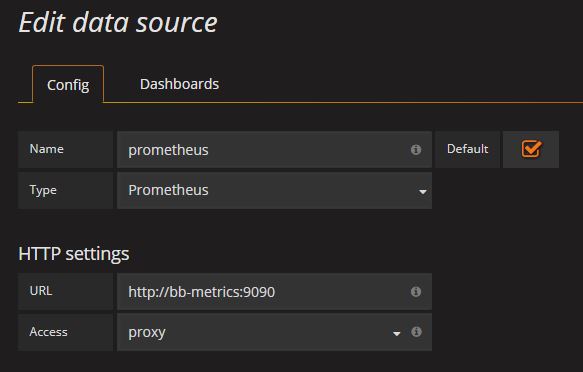
To see the application metrics in Grafana, you need to configure the dashboard:
Log in to Grafana with the credentials admin / admin.
Add a new data source with the following details:
-
Name: prometheus
-
Type: Prometheus
-
URL: http://bb-metrics:9090
From the Grafana icon, click Dashboards… Import and load the JSON dashboard file from v5 /dashboard.json. Select the Prometheus data store.
You’ll now see the application dashboard - send some load into the app by refreshing the browser, and the graphs will be populated:

Cleanup
You can easily remove the whole application by removing the stack:
docker stack rm bb
And you can leave swarm mode to return to a single-server Docker host:
docker swarm leave --force
Thanks for completing the Node.js and SQL Server lab! You’ve learned how to build and run applications with Docker and Docker Compose, how to achieve high availability with Docker Swarm and how to get your application production ready by adding a proxy and a metrics dashboard.
The Play with Docker Training site is always on, and there are plenty more labs you can try at home.


